Rapid Issue and Rapid Receipt Feature
The Rapid Issue feature and the Rapid Receipt feature is designed to rapidly issue items and receive items during a stock issue and a stock receipt. When you use this feature, you are able to consecutively add the items to be issued or received. Also, you have the option to lock a field's value; this eliminates the need to continually re-enter it.
Enabling the Rapid Issue Feature
To use the Rapid Issue feature, you must turn it on at the User Preferences form.
- Select Tools > Preferences to reach the User Preferences form.
- Tap the Issue tab to bring it to the front.
- Mark the Use rapid issue detail form checkbox to use the Rapid Issue feature.
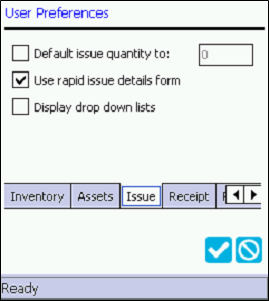
Note: The Mobile Drop Down Lists feature is not available with Rapid Issue.
- Tap the Save icon to save these settings and use the Rapid Issue Details form.
Enabling the Rapid Receipt Feature
To use the Rapid Receipt feature, you must turn it on at the User Preferences form.
- Select Tools > Preferences to reach the User Preferences form.
- Tap the Receipt tab to bring it to the front.
- Mark the Use rapid receipt detail form checkbox to use the Rapid Receipt feature.
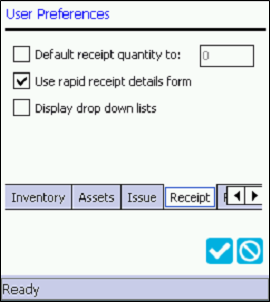
Note: The Mobile Drop Down Lists feature is not available when using Rapid Receipt.
- Tap the Save icon to save this setting and use the Rapid Receipt Details form.
Using the Rapid Issue and Rapid Receipt Feature
When you use the Rapid Issue and/or Rapid Receipt feature, items are consecutively added to the order. After adding an item, immediately add another one. You do not have to go back and forth between the main Issue form or Receipts form and the Issue Detail form or Receipt Detail form.
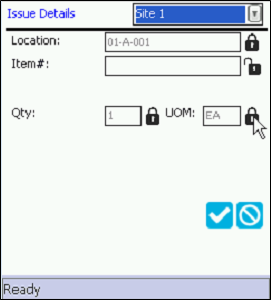
Locking Fields
With the Rapid Issue and the Rapid Receipt feature, each field at the Details form may be locked. This is useful if you are receiving the same quantity for each item or issuing items from the same location. By locking a field, the field entry does not have to be continually re-entered during the item issue/item receipt. This allows for faster item issue and item receipt because you do not have to continually scan the value in the locked field.
Using the Lock Feature
A field that may be locked contains a Lock icon  to the right of it. To lock a field, enter the information in this field and lock it for the entire item issue or receipt session by tapping the Lock icon. The icon will change to show that the lock is closed
  and the field will have a gray background, indicating that it is locked for this item issue/receipt session.